Almost all small-medium scale businesses store their crucial business data in either Excel or in Google Spreadsheets.
Though it is a better idea than storing data on papers, managing spreadsheets is a labor-intensive task.
Things get worse when businesses have to perform repetitive tasks on spreadsheets. It increases the possibilities of errors and also wastes the time of the workforce.
To overcome this challenge, both Excel and Google Spreadsheets come with a unique automation feature called Macros which automates any process on Google Spreadsheets.
In this blog, I will share how to use Macros in Google Spreadsheets to automate a time-consuming and repetitive task.
Problem:
A company’s HR team stores all details of the employees in the Google Spreadsheet. Every month, the HR team has to send this Google Spreadsheet to the company CEO. But the challenging task here is, the CEO wants only a few data. So every time the HR team has to rearrange the data in the spreadsheet before sending it to the CEO.
This practice requires time and effort. We can fully automate this spreadsheet data formation or rearrangement process using macros function. It is an in-built function and one can easily implement it.
Read: 10 Useful Things Google Docs Can Do
Solution:
The following is the complete tutorial for beginners to automate the process into Google spreadsheets.
- This is what the HR team has – a poorly designed or formatted spreadsheet containing all information of the employees.

The HR team has to send this spreadsheet to the CEO. However, the CEO is expecting a well-formatted spreadsheet with only 5 columns – ID No, Name, Age, Salary, and Address.
So, now let’s create automation using macros function so that by just a single click, the HR team can rearrange the spreadsheet before sending it to the CEO.
- You can find the macros function on the ‘tool’ menu.
- From macros function, select on ‘Record Macro’.
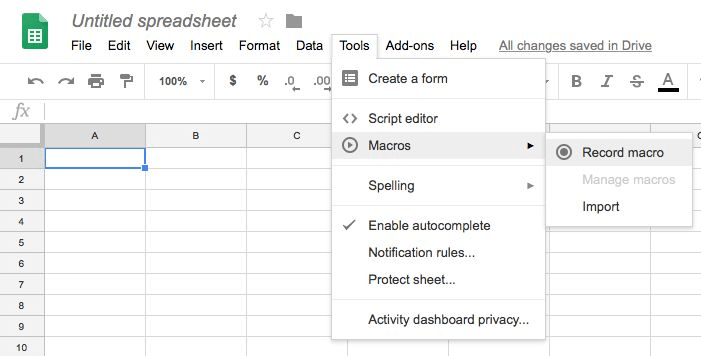
- Once you select ‘record macro’, the in-built automation module automatically starts recordings of your process on the spreadsheet. Here, for the first time, you have to perform the task manually which you want to automate.
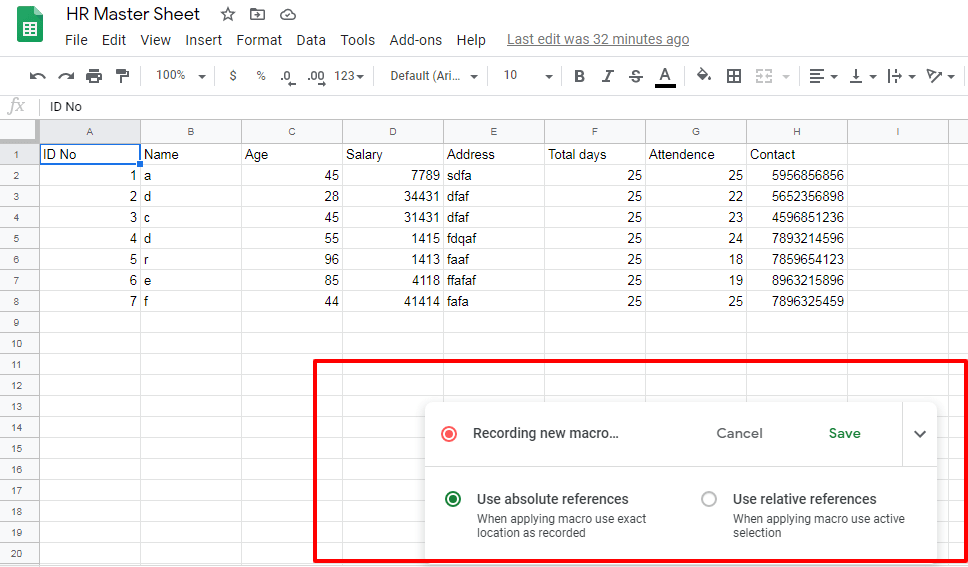
- It is worth mentioning that you have to select ‘Use Absolute References’ when you are applying automation to the location where you are recording tasks. For other locations, you need to select ‘Use Relative Reference’. (We will select ‘Use Absolute References’ as we want to automate the task for this spreadsheet only.)
- Once you are done with performing the task manually, save the macros and give a name to it. You can even assign a shortcut.

- The rearranged file HR will send to the CEO is now looking like this – after we manually applied all changes on the spreadsheet and the macros have recorded all.
Img5

- Till now, we basically developed a program in which the HR team can run now onwards to turn a poorly formatted spreadsheet into the spreadsheet format the CEO of the company expects.
- So, now let’s run it to rearrange the poorly formatted file automatically.
- To run the macros we created, all we need to do is, click on the tools > Macros > Rearrangement. (Here, Rearrangement is nothing but the macros name.)
- Once we click on it, it will automatically rearrange our spreadsheet and give us the output like the following.

- You can also set up triggers for this spreadsheet. Using triggers, you can fix the time when ‘Rearrangement’ macros automatically runs and rearranges the file. (HR team doesn’t even have to manually start the automation!)
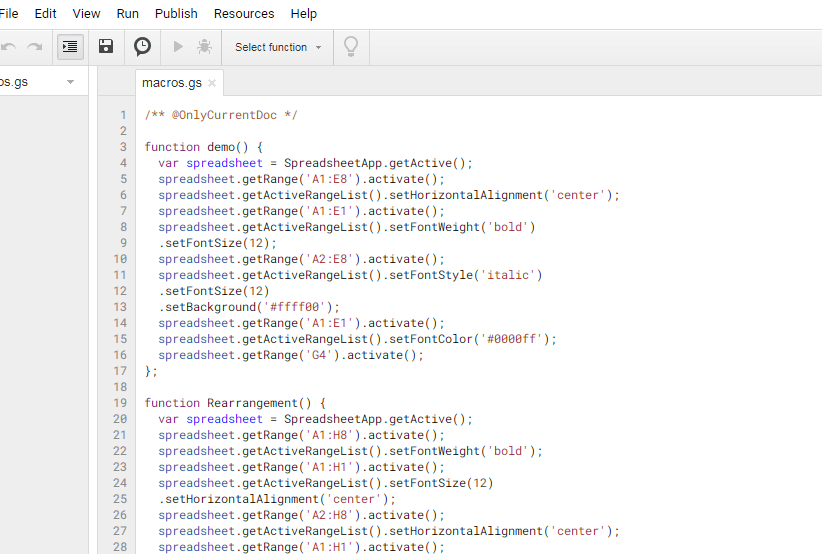
- To set up triggers, click on Tool > Macros > Manage Macros > Edit Script.
- Once you click on Edit Script, a new window will open up like this.
- Here, click on the Edit > Current Project’s Trigger and select ‘Add Tigger’.

- Here, you can set up the custom trigger. For instance, we have set up the time-driven event which automatically runs the macro functions on the first day of every month between midnight to 1 am.

That’s it. We have just reduced the effort of the HR team by automating the Google Spreadsheet. This is just a basic process I discussed to make you understand automation easily. Excel automation is complex work and it sometimes requires other third-party automation tools such as UIPath and Winautomation to automate complex Excel or Google Spreadsheets-based processes.
These automation tools work beyond the macros function. In fact, these tools are so useful that any process with Excel or Google Spreadsheets can be automated.
Automation tools like Winautomation and UIPath can automate the following Excel based tasks.
- Reading and writing data.
- Data extraction and migration.
- Sorting data and deleting duplicate rows.
- Comparing columns.
- Integrating with other applications and databases.
- Retrieving and creating workbooks.
- Running analysis reports.
- Filling in forms with data from Excel spreadsheets
Final Words:
Excel or Google Spreadsheets are in the core of business practices. Almost all businesses are using it in either direct or indirect ways. But the processes with spreadsheets really eat up time and increase the chances of errors. Here is why automation plays an important role.
Both Excel and Google Spreadsheets come with an in-built automation workflow builder called macros function. In this blog, we have automated a simple process regarding spreadsheet formation. For complex processes, you need to create software bots using a top automation platform and purchase the license of the robot. It is the same as having a virtual employee!
You might also like
Slow Google Chrome: How to Fixed it?